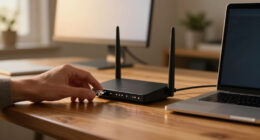

This guide helps you select, fit, and install a privacy screen protector on a laptop, then check that it works as intended. It is written for beginners who can identify their laptop model and clean a screen carefully. Allow about 20-40 minutes, including time to confirm the dimensions and prepare the display. You will finish with a filter that sits straight, stays attached, and keeps the screen readable from a normal seating position.

Get privacy and security gear delivered free with Prime
- Fast, free delivery on millions of items
- Prime Video, Amazon Music and more included
- Member-only deals all year
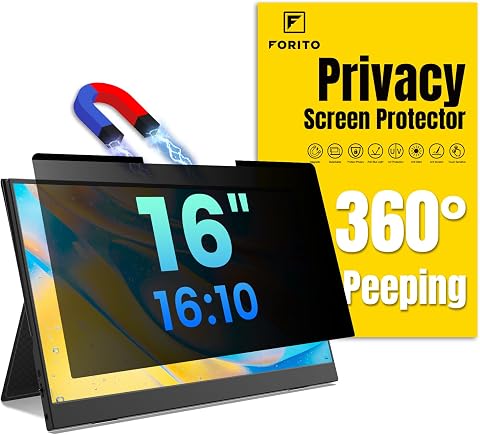
F FORITO Magnetic Laptop Privacy Screen 16 inch 16:10, 360° Anti Peeping Removable Anti Glare Blue Light Filter
- ✔ Screen size: 16 inches
- ✔ Aspect ratio: 16:10
- ✔ Compatibility: Laptop 16-inch 16:10

Magnetic Laptop Privacy Screen for 16 Inch 16:10 Aspect Ratio
- ✔ Screen size: 16 inches
- ✔ Aspect ratio: 16:10
- ✔ Display dimensions: 13.57 in W × 8.48 in H

15.6 Inch Privacy Screen Filter for 16:9 Monitor 1920 x 1080 Resolution
- ✔ Screen size: 15.6 inches
- ✔ Aspect ratio: 16:9
- ✔ Resolution reference: 1920 × 1080
Difficulty: Beginner | Time: 20-40 minutes
What You’ll Need
Tools & Materials:
- Laptop and its exact model number
- Ruler or tape measure
- Microfiber cloth
- Screen-safe cleaning solution, if the screen needs it
- Privacy filter with the correct size and attachment type
- Dust-free, well-lit work area
Knowledge:
- Basic ability to find a laptop model number in its settings, on a label, or in its documentation
- Ability to measure the visible display area rather than the laptop body
Check the laptop maker’s guidance before attaching a filter. Some laptops have touchscreens, narrow bezels, glass-covered displays, camera shutters, or magnetic lid sensors that can affect compatibility. Do not use household glass cleaner, paper towels, or abrasive cloths on the display. If the laptop is under warranty, check its care instructions before using adhesive strips.
F FORITO Magnetic Laptop Privacy Screen 16 inch 16:10, 360° Anti Peeping Removable Anti Glare Blue Light Filter
For a compatible 16-inch 16:10 laptop, F FORITO has the strongest all-round case in this group. Its reversible matte and glossy surfaces let us choose between a less reflective finish and a smoother-looking one, a useful distinction when the same laptop moves between office lighting and travel. The listing also advertises 360-degree privacy, a broader claim than the side-view protection described for the other two filters. We would still treat that as a stated feature, not a promise that every viewing position is blocked equally.Compared with the other 16:10 model, F FORITO offers more choice in screen finish, but the simpler magnetic screen provides clearer stated display dimensions and highlights easy removal. F FORITO’s claim of 96% blue-light blocking also exceeds the other model’s stated 49%, though buyers should not choose a privacy filter on that figure alone. The tradeoff is that F FORITO may dim the display slightly, and the manufacturer stresses precise measurement. Its magnetic and adhesive attachment options may not suit every laptop bezel, either. For a correctly measured screen where finish flexibility matters, this is the most versatile recommendation; for a quick, low-fuss fit, the other magnetic 16:10 option may be easier to assess.
Pros:
- Reversible matte and glossy surfaces offer two finish options
- Advertises 360-degree privacy for use in shared spaces
- Magnetic and adhesive attachment features provide installation alternatives
- Lists anti-glare, scratch-resistant, and smudge-resistant properties
Cons:
- May reduce screen brightness
- Precise measurement is needed, and magnetic attachment may not suit every laptop
- The listed 96% blue-light-blocking claim does not establish a particular comfort outcome
Best for: Owners of a measured 16-inch 16:10 laptop who want a removable filter with a choice of matte or glossy viewing surfaces.
Not ideal for: Touchscreen users, buyers unwilling to measure carefully, or anyone prioritizing maximum display brightness over privacy.
Bottom line: We rank F FORITO first for compatible 16:10 laptops because its reversible finish adds practical flexibility, provided careful fit and some brightness loss are acceptable.
“We rank F FORITO first for compatible 16:10 laptops because its reversible finish adds practical flexibility, provided careful fit and some brightness loss are acceptable.”
Magnetic Laptop Privacy Screen for 16 Inch 16:10 Aspect Ratio
This screen makes the most sense when we want a removable magnetic filter for a 16-inch 16:10 laptop and value a clearly specified display area. Its stated panel dimensions—13.57 inches wide by 8.48 inches high—give us more to check against the laptop than a diagonal measurement alone. The design also combines privacy filtering with an anti-glare surface and a stated 49% blue-light reduction, making it a practical fit for shared desks and bright environments.Compared with F FORITO, this model sounds simpler: it emphasizes magnetic attachment and does not offer the same reversible matte/glossy choice or the same 360-degree privacy claim. That straightforwardness may appeal to buyers who want to remove the filter quickly, but the product notes that optional accessories may be needed. Its stated viewing angle is limited to ±30 degrees, and it does not block visibility directly behind the screen, so we should not interpret “privacy” as protection from every position. It may also soften screen sharpness, a meaningful drawback for detailed graphics or text work. Unlike the 15.6-inch 16:9 filter, however, it is aimed squarely at taller 16:10 displays.
Pros:
- Removable magnetic design supports quick attachment and removal
- Provides stated display width and height for fit checking
- Combines privacy filtering with anti-glare treatment
- Lists 49% blue-light reduction
Cons:
- May slightly soften screen sharpness
- The stated ±30-degree viewing angle does not protect against someone directly behind the screen
- Optional accessories may be needed for some setups
Best for: People with a 16-inch 16:10 laptop who want a removable magnetic filter and can confirm their panel matches the listed dimensions.
Not ideal for: Users who need privacy from someone directly behind them, demand crispest possible image detail, or prefer multiple surface finishes.
Bottom line: We recommend this as the straightforward magnetic alternative for a precisely matched 16:10 display, especially when easy removal matters more than finish options.
“We recommend this as the straightforward magnetic alternative for a precisely matched 16:10 display, especially when easy removal matters more than finish options.”
15.6 Inch Privacy Screen Filter for 16:9 Monitor 1920 x 1080 Resolution
This is the only option here designed for a 15.6-inch 16:9 display, so its value is fit-specific rather than broadly flexible. The listed 13 9/16-inch width and 7 5/8-inch height help narrow down compatibility, while slide-on/off or mounted installation gives buyers alternatives to the magnetic approach used by both 16-inch 16:10 screens. It also claims side-view privacy and 30% blue-light blocking, with dust and scratch protection as secondary benefits.We would choose it over the two 16:10 filters only when the laptop’s actual display matches this format. It explicitly does not fit 16:10 screens and is not compatible with touchscreens, which makes it the least adaptable pick in the roundup. Compared with the magnetic models, its stated blue-light reduction is lower than either, and the product information gives fewer details about finish choices or attachment through magnets. In return, it serves a common 16:9 size that the other two are not meant to cover. Buyers should verify the visible display area—not just the laptop’s advertised diagonal—before ordering, since a close size match is not necessarily a correct fit.
Pros:
- Targets a specific 15.6-inch 16:9 laptop format
- Provides stated width and height for compatibility checks
- Offers slide-on/off or mounted installation options
- Adds stated side-view privacy and dust and scratch protection
Cons:
- Not compatible with touchscreens
- Does not fit 16:10 displays
- Lists 30% blue-light blocking, below the claims made for the two 16:10 options
Best for: Owners of a non-touch 15.6-inch 16:9 laptop whose measured display area matches the listed dimensions.
Not ideal for: Anyone with a touchscreen, a 16:10 laptop, or a display whose panel dimensions differ from the stated measurements.
Bottom line: This is the right-format specialist for a matching non-touch 16:9 laptop, but its strict compatibility limits make it a poor substitute for either 16:10 screen.
“This is the right-format specialist for a matching non-touch 16:9 laptop, but its strict compatibility limits make it a poor substitute for either 16:10 screen.”
As an Amazon Associate we earn from qualifying purchases.
Before You Start
Privacy filters reduce the side angle from which a screen can be read; they do not hide information from someone directly behind you or protect files from digital access. Most filters make the display dimmer and can alter its appearance. Identify which side faces the screen and which side faces you by checking the product labels or instructions. If the filter is reversible, test the viewing direction before attaching it. Shut down the laptop, unplug it, and let the screen cool before cleaning or fitting the filter.
Step-by-Step Instructions
Step 1: Identify your laptop and display
Find the laptop’s full model name and number in the system settings, on the underside label, or in the manufacturer’s documentation. Record it exactly, including any letters or numbers after the main model name. Check the manufacturer’s specifications for the display size and whether the screen is touch-enabled. Do not rely on the laptop’s advertised diagonal size alone: two laptops with the same diagonal measurement can have different screen shapes, bezel widths, or mounting layouts.
Tip: If you cannot locate the model number, check the manufacturer’s support page or the label on the original packaging. Avoid guessing based on appearance.
Check: You have the complete model identifier and know whether the display is touchscreen.
Step 2: Measure the visible screen area
Open the laptop and measure the display area that actually shows an image. Measure its width from the left edge of the active display to the right edge, then measure its height from the top active edge to the bottom active edge. Do not include the bezel or plastic frame. Record both measurements and compare them with the filter manufacturer’s compatibility chart. Check whether the listed dimensions describe the filter itself or the laptop display it fits.
Tip: If the filter attaches to the bezel, also check that the attachment method has enough clear space and will not cover the camera, microphone, or lid sensor.
Check: You have the active display’s width and height, plus any bezel or feature constraints that affect mounting.
Step 3: Choose a compatible filter and attachment method
Match the filter to the laptop model or to the measured active display dimensions. Check the listed aspect ratio, screen type, and attachment method. Common options include adhesive tabs, sliding tabs, and magnetic attachment. Choose one that suits your bezel and whether you want to remove the filter regularly. Confirm which surface faces outward and whether the filter supports touchscreen use; many filters reduce touch responsiveness or are not designed for touch displays.
Tip: Do not buy a filter based only on the diagonal screen size. If the product chart does not list your model, ask the seller to confirm the exact width, height, and mounting fit before ordering.
Check: The product specifications match your display dimensions and the laptop’s screen and bezel features.
Step 4: Prepare the laptop and work area
Shut down the laptop, unplug the charger, and place it on a stable surface with the display open. Wash and dry your hands. Keep the filter’s protective films in place until the display is clean and you are ready to install it. Clear the work area of loose paper, fabric, and other dust-producing items. Read the filter’s fitting directions so you know which tabs, adhesive strips, or magnets to use before handling the screen.
Tip: Do not press hard on the display or flex the lid while working. Laptop panels can be damaged by pressure, especially near the edges.
Check: The laptop is powered off, stable, and positioned where you can reach the full display without bending it.
Step 5: Clean and dry the display
Use a clean, dry microfiber cloth to lift dust and fingerprints with light strokes. If residue remains, apply a small amount of screen-safe cleaner to the cloth, not directly to the display, and wipe gently. Follow the laptop maker’s care instructions if they differ. Let the screen dry completely, then inspect it under a light from several angles. Remove any visible dust with the cloth before fitting the filter.
Tip: Moisture trapped under a filter can leave marks or affect adhesion. Never spray liquid near the webcam, screen edges, keyboard, or hinges.
Check: The display is dry and free of visible dust, streaks, and oily marks.
Step 6: Test the filter’s orientation and fit
Hold the filter by its edges and place it against the display without removing its protective film or exposing adhesive. Align its top and side edges with the active screen, leaving equal spacing where the product design calls for a gap. Check that it does not cover the webcam, touch sensors, or other display features. Look at the screen from your usual seated position and from each side to confirm which face should point toward you.
Tip: Some filters have a preferred top edge or one-way viewing direction. Follow the supplied markings rather than assuming the glossy side faces outward.
Check: The filter matches the display area, clears important features, and is oriented so the intended viewing position remains readable.
Step 7: Attach the filter
Use the attachment system supplied with the filter. For adhesive tabs, place the tabs where the instructions specify, keeping them off the active display unless the design explicitly requires otherwise. For sliding tabs, fit the holders to the bezel without forcing them. For a magnetic filter, align the magnets with the designated frame area and check that the laptop lid sensor is not affected. Remove the protective film only when ready, hold the filter by its edges, and lower it into place slowly, aligning the top edge first. Press only on the attachment points or filter edges as directed.
Tip: If the filter lands crooked, do not drag it across the screen. Lift it carefully using the edges and reposition it according to the product instructions. Avoid touching the display-facing surface.
Check: The filter is straight, secure, and free of trapped debris or visible bubbles.
Step 8: Check the display and privacy effect
Turn on the laptop and view the screen from your normal working position. Check that text is readable, the image is acceptably bright, and the filter does not cover the camera or interfere with closing the lid. Move to the left and right sides at typical shoulder-level viewing positions to see whether the screen becomes difficult to read. Recheck the filter’s fit after opening and closing the lid once. If the display looks unusually dark, tinted, or blurred, confirm the orientation and compatibility before continuing to use it.
Tip: A privacy filter narrows visibility but cannot block every angle. Use a screen lock when stepping away and avoid displaying sensitive information in public.
Check: The screen is clear from your normal seat, harder to read from the sides, and the lid and laptop features work normally.
Common Mistakes to Avoid
- Choosing a filter by diagonal size alone. — Match the exact laptop model or compare the active screen’s width, height, and aspect ratio with the seller’s fit chart.
- Leaving dust, fingerprints, or moisture under the filter. — Clean and dry the display fully, inspect it under light, and expose the filter’s attachment surface only when ready to install.
- Installing the filter backward or upside down. — Read the orientation markings, test the viewing direction before attaching, and check for any designated top edge.
- Pressing hard or sliding the filter across the panel to align it. — Hold it by the edges, lower it into place gradually, and lift it gently to reposition rather than dragging it.
Troubleshooting
Problem: The filter is too wide or too tall for the display.
Solution: Remove it carefully without cutting or trimming it unless the manufacturer explicitly permits trimming. Check the model and measured active area again, then exchange it for the correct size. Cutting can damage the filter’s layers or leave sharp, uneven edges.
Problem: Bubbles, dust spots, or streaks appear after installation.
Solution: Check the product instructions for removal and reinstallation guidance. Lift the filter from an edge without bending it, clean the display with a dry microfiber cloth, and remove dust before fitting it again. Do not push a dust particle across the panel or use a pin to puncture a bubble.
Problem: The screen is dark or hard to read from the normal seat.
Solution: Confirm that the filter faces the correct direction and is compatible with the laptop. Increase display brightness within comfortable limits and check the screen from a straight-on position. If the image remains unacceptable, remove or return the filter and choose a different model.
Problem: A magnetic filter stops the laptop from sleeping or waking as expected.
Solution: Remove the filter and test lid behavior again. If the problem stops, the magnets may interfere with the lid sensor. Use a nonmagnetic attachment style approved for the laptop, and contact the laptop maker if the behavior continues without the filter.
What Success Looks Like
The filter matches the active display without covering the webcam or other controls. It sits straight and stays attached when the lid is opened and closed. The display remains readable from your normal position, while people viewing from common side angles have difficulty reading it. The screen has no trapped dust or distracting bubbles, and the laptop’s touch, lid, camera, and sleep functions behave as expected for your model.
Next Steps
Keep the filter’s storage sleeve and fitting instructions so you can remove and store it safely when not needed. Clean the outward-facing surface with a soft microfiber cloth and follow the filter maker’s care directions; avoid solvents and abrasive materials. Check the attachment points periodically, especially after removing and reinstalling the filter. Lock the laptop whenever you leave it unattended, and position the display away from nearby sightlines when working with sensitive information. If the filter repeatedly interferes with touch, brightness, the webcam, or lid sensing, stop using it and ask the laptop or filter maker about a compatible alternative.
Frequently Asked Questions
Can I use a privacy filter on a touchscreen laptop?
Only if the filter’s specifications explicitly support your touchscreen model or touch use. Some filters reduce touch sensitivity, and some attachment designs can interfere with touch edges. Verify compatibility before installing and test touch response across the full screen afterward.
Can I cut a privacy filter to fit?
Do not cut it unless the manufacturer says it is safe to trim. Many filters contain layered optical materials, and cutting can damage those layers or create edges that do not attach securely. Select a product made for the measured display instead.
Does a privacy filter protect information from everyone?
No. It limits visibility from side angles, but someone directly behind you or near your viewing position may still see the screen. It also does not protect data from software, account access, or an unattended laptop. Use a screen lock and keep sensitive information out of view when needed.
Will a privacy filter make my screen dimmer?
Usually, yes. The filter blocks some light and may change contrast or color. Check the product specifications and test the display at your usual brightness. If the image is uncomfortable or too dim, try a compatible model designed for your display or remove the filter.
Halloween Picks
halloween
As an affiliate, we earn on qualifying purchases.